
When water seeps into your hardwood floors, the clock starts ticking. What many homeowners don’t realize is that the signs of damage aren’t always obvious—until it’s too late. This Ultimate Guide to Wood Floor Drying (also called Wood Floor Rescue) walks you through how to detect, respond to, and restore wood floors after water intrusion using industry-leading systems like Dri-Eaz Rescue Mat and Injectidry HP60.
As an IICRC Master Water Restorer with over 30 years of experience, I’ve seen hundreds of cases where early action could have saved thousands in repairs. Here’s what you need to know to act fast and protect your investment.
What Is Wood Floor Drying (Wood Floor Rescue)?
Wood floor drying—often referred to as wood floor rescue—is the process of extracting moisture from water-damaged hardwood or engineered wood floors without tearing them out. Specialized vacuum mats, injectors, and negative pressure systems draw moisture from beneath the planks and subflooring to prevent warping, cupping, and mold growth.
When executed quickly and correctly, wood floor rescue can:
- Prevent costly tear-outs and replacements
- Stop mold from forming under floors
- Restore floors to pre-loss condition
- Preserve insurance eligibility
This guide focuses on two industry-trusted systems: Dri-Eaz Rescue Mat System and Injectidry HP60 Floor Drying System.
Industry-Leading Equipment
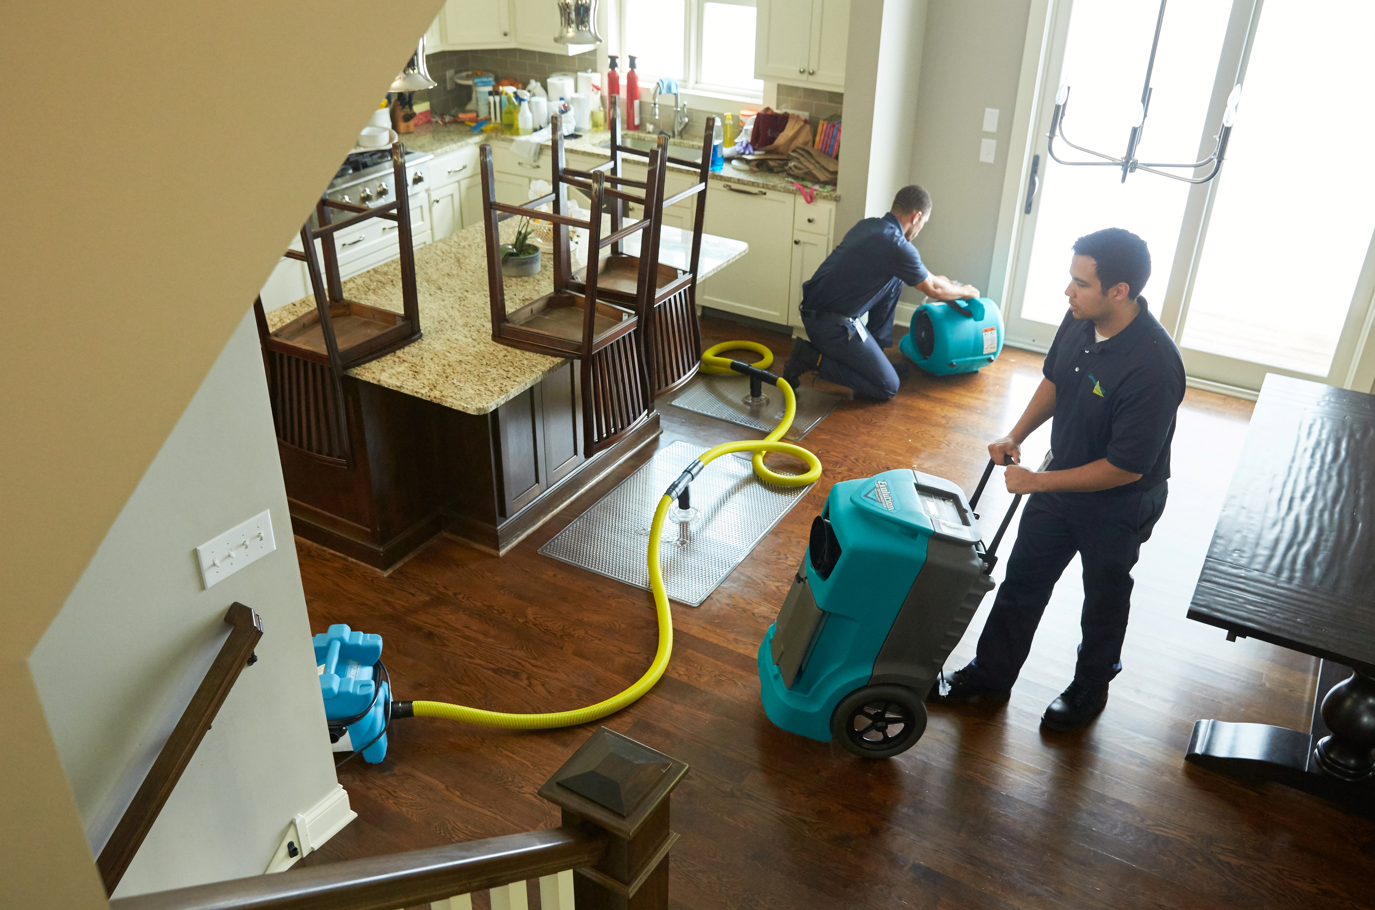
Dri-Eaz Rescue Mat System (by Legend Brands)
- Purpose: Extracts moisture from hardwood and subfloors using high-pressure suction.
- Components:
- 4 large mats (46″ × 30″)
- 2 small mats (23″ × 30″)
- 3 hoses (7 ft. each)
- T-connectors, gaskets, and cuffs for tight vacuum sealing
- Best For: Flat, accessible wood surfaces; quick deployment
- Compatible With: DriForce InterAir, HVE 3000, or other high-CFM vacuum units
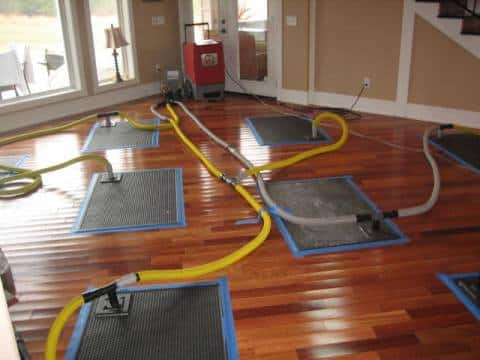
Injectidry HP60 Floor Drying System
- Purpose: Pulls moisture from below hardwood planks and into Vac-It panels
- Components:
- HP60 power unit
- Vac-It floor panels with T-fittings and hoses
- Expandable for ceilings and wall cavities
- Best For: Complex floor layouts, older homes, multi-room setups
- Compatible With: Negative air systems or high-capacity suction devices
Both systems are designed for speed, precision, and minimal floor disruption, and are critical tools in any serious water damage restoration strategy.
Step-by-Step Wood Floor Drying Process
1. Moisture Detection
Before starting any drying process, the extent of the damage must be assessed using moisture meters and infrared thermal imaging. Professionals locate the highest concentration of moisture and evaluate whether it has penetrated the subfloor or traveled laterally.
Why it matters: Moisture trapped beneath wood floors can cause irreversible warping, rot, or microbial growth. Accurate detection is the first step in any successful wood floor drying effort.
2. Equipment Setup
Once wet areas are identified, technicians install the chosen floor moisture extraction system:
- Dri-Eaz Rescue Mats are laid directly over the affected area, forming a tight seal.
- Injectidry Vac-It panels are positioned with hose attachments, allowing suction to draw moisture from below the planks.
High-capacity extractors, such as the DriForce or HP60, are then connected to apply negative air pressure.
3. Drying Operations
With equipment in place, technicians begin the active drying process. Negative air pulls trapped water vapor through the wood, up into the mats or panels, and out through the exhaust system.
This process can take 2–4 days, depending on the severity of the saturation, the floor’s material, and ambient humidity levels.
4. Monitoring Progress
Throughout the drying period, moisture levels are monitored daily using non-invasive meters. Readings help determine whether the process is working effectively or adjustments are needed.
This stage is essential for verifying that hardwood floor drying is occurring uniformly and safely.
5. Restoring Humidity Balance
Once target moisture levels are achieved, dehumidifiers are used to stabilize the surrounding air. This step helps restore a normal RH (relative humidity) level and prevents secondary damage to walls, cabinets, or nearby surfaces.
Drying wood floors isn’t just about extraction—it’s about creating a balanced environment.
6. Post-Remediation Cleanup
Finally, once equipment is removed, technicians sanitize and clean the affected areas. If floors are visibly damaged (cracked finish, discoloration), light refinishing may be recommended—but in many cases, the floors are saved entirely without replacement.
This comprehensive 6-step approach ensures long-term protection and reduces the risk of mold or structural compromise.

FAQs: Wood Floor Drying Explained
How long does it take to dry wood floors after water damage?
Typically, 2–4 days with proper equipment, but deeper saturation or high humidity may extend drying time.
Can warped wood floors go back to normal after drying?
In many cases, yes—if caught early. Cupping and minor warping may flatten once moisture is removed, but severe damage may require sanding or refinishing.
Is wood floor drying covered by insurance?
Most homeowners insurance policies cover water damage if it’s sudden and accidental. Coverage may vary for gradual leaks or neglected maintenance. Always document damage early.
How do I know if my wood floor is dry?
Professionals use moisture meters to measure levels in the floor and subfloor. Visual dryness isn’t enough—moisture content must fall within acceptable restoration standards.
What happens if I skip professional drying?
You risk mold growth, rotting subfloor, warped boards, and potential health hazards. DIY drying methods rarely reach underfloor moisture.
Local Expertise You Can Trust
At ServiceMaster Restoration By Simons, we provide expert hardwood floor drying services throughout Chicago and the North Shore, including Evanston, Skokie, Glenview, and Lake County. Whether your home suffered a leak, overflow, or flood, our certified team uses state-of-the-art drying systems to restore your floors—fast.
📞 Call us today at 773-376-1110
🌐 Visit: https://www.servicemaster-restorationbysimons.com
Internal Links:
- Water Damage Restoration
- Mold Remediation Services
- Basement Cleaning Services
- Hidden Signs of Water Damage
This guide is authored by Sam Simon, IICRC Master Fire & Water Restorer and co-author of RESTORE: A Complete Guide to Protecting Your Home As Your Most Valuable Asset.